Single sign on
Yarkon Server supports single-sign-on using the standard SAML2 protocol. That means that you can set up Yarkon to work with your Identity Provider system (e.g, Active Directory), so that end users could log into their Yarkon client web application, using their enterprise provisioned and managed passwords.
Single Sign On Flow
Yarkon Server supports both the Identity Provider Initiated flow and the Service Provider Initiated flow.
Identity Provider Initiated
In this single-sign-on flow, the user starts with the Identity Provider (say, a page shared to all users in the company, listing all the applications users can log in to). Once the user authenticates with the Identity Provider, then clicking on the link/button associated with Yarkon will open the Yarkon client with the proper permissions.
Service Provider Initiated
In this single-sign-on flow, the user starts with the client, the Yarkon web application. Yarkon will immediately redirect to the Identity Provider, that will present the user with the log in form. Once authenticated, control will return to the Yarkon web application and the user will be logged in.
Yarkon Admin Console Set-up
Use the Yarkon Admin Console to set up your SAML integration with the Identity Provider system you use in your company. Yarkon supports two modes of operation:
- Users managed in Yarkon - in this mode, you keep a list of users eligible to use Yarkon in the Yarkon application database. You can assign IAM permissions to users using Yarkon and verify their access using Yarkon Admin Console. This mode is applicable for smaller groups, especially when relatively few users in a large organization have access to Yarkon, or when you have many small groups using separate Yarkon servers.
- Pass Through - in this mode, users are only managed in your Identity Provider. When a user attempts to use Yarkon, the decision whether to allow it is deferred to the Identity Provider. IAM permissions for users are managed in the Identity Provider as well. See below an example of this set up using Auth0, a commonly used Identity Provider. This mode is best for large organizations that have to manage many users.
Here is a more detailed comparison between these two modes:
| SSO Mode | Description | Benefits | Requirements |
|---|---|---|---|
| Yarkon | Users are managed in Yarkon, similar to non-SSO modes of Yarkon. |
|
|
| *Pass Through [v3.8+] |
Users are managed in the Identity Provider, user records are kept in the Identity Provider only. |
|
|
Follow these steps to get Yarkon set up for single-sign-on access in your organization:
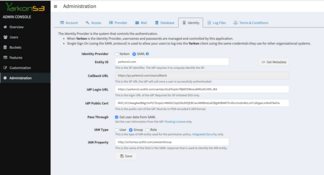
If your Identity Provider system supports it, you can use the Metadata from Yarkon and ingest it directly. Otherwise, you can manually enter the required details:
- The
Callback URLis the Yarkon end point the Identity Provider should call once identity is confirmed. It will be auto populated for you, based on the host name you designated for the Yarkon server in your environment. - The
IdP Login URLis the end point in the Identity Provider domain Yarkon should defer to. It depends on the system you have. In this sample, using our Auth0 provider, the end point ishttps://yarkons3.auth0.com/samlp. - The
IdP Public Certis the security key used to ensure the communication between all parties of the system is secure and is not tampered with. It must be PEM-encoded X.509 format, and will be available for you from the Identity Provider interface once you set up the integration. - The
Name ID Formatdescribes the format used when passing the username to Yarkon. The default is for AD isurn:oasis:names:tc:SAML:1.1:nameid-format:unspecified.
If you are using the Pass Through mode, you need to provide the following as well:
- Check the
Pass Throughoption. - Define the
IAM Typeyou are using in your organization - by role, group or username. - In the
IAM Property, specify the name of the SAML attribute your Identity Provider would use to communicate the value.
In the image above you can see how the form should look like when set up with Auth0. In this specific case, we define the user's permissions based on the IAM Group they belong to. Of course, different users can belong to different groups.
When you are done, Save the settings in Yarkon, and you should be all set. When users are now trying to access the main application page of Yarkon, they would be redirected to the login page presented by the Identity Provider. It should properly handle their session information as well. Once login is verified, through the redirect scheme described in the image above, the Yarkon Web Application would be opened.
Identity Provider Set-Up
The set-up on the IdP side depends on the one you have. Yarkon expects one of the following SAML attributes to be used:
- upn
- name_id
When not using the Pass Through option, the value passed in it must be the username used in Yarkon, the email of the user.
Note that the standard Name Id attribute should be used when using Active Directory, and you are setting up for the SP initiated SAML process, as it is required for session handling.
When using the Pass Through option, you also have to set the IAM entity name at the user record. See below for an example of how the form should look like when using Auth0. In this specific case, we give this users the permissions of the qa-finance group. Note that the (arbitrary) property name, in this case it is awsIamGroup, must match what was previously specified in the Yarkon Admin Console; since Auth0 uses a name space for the attributes name, the full name has to be specified as "http://schemas.auth0.com/awsIamGroup".

