High Availability
The purpose of a "High Availability" Yarkon set up is to ensure that there is no service interruption in the event of a hardware or software failure.
The architecture described below is based on our experience running Yarkon in a multi-tenant environment under constant load, so it is probably a good start for your set up as well. Having said that, you can choose to set your system differently, as long as you follow the principles described in this document.
System Diagram
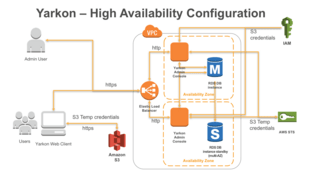
Use the below diagram as a reference for your build up. It covers the essentials of a proper HA setup of Yarkon:
Compute Resources - Servers
We recommend running the Yarkon service in a standard "N+1" configuration, relying on horizontal scalability. To figure out the number "N", you need to know the number of expected users. We recommend using t3.small instances with about one instance per 1,000 users. You can use fewer, larger instances.
For instance, if you expect to have 4,000 users, we recommend using 4+1=5 Yarkon instances to ensure high availability.
The standard Yarkon AMI allocates 8 GB of disk space, and it is sufficient for the normal operation of the server.
Shared Storage - Database
For the HA set up to work, all instances (servers) require access to a shared database.
Database Type
Yarkon can work with any of the following widely available databases:
- MySQL
- MariaDB
- SQLite
- PostgreSQL
We run our environments on MySQL, so will describe that use case, but you can use any of the others with minor or no changes.
Our recommendation is to use AWS RDS for the database. It takes care of handling backups and recovery, and gives you high-availability for the database out of the box, as long as you use the "Multi-AZ" option. To save on cost, start with a small instance, and only increase it if you see that the performance of the database is degraded (use the AWS monitoring tools for that).
If you prefer to build your own database, you can definitely do so, but you then have to make sure to take care of backups and maintenance.
Database Setup
Once you have your database up and running, you need to create the schema for Yarkon. Together with our trial version, we provide an initial schema creation SQL script that you can use to prepare the database.
The script is located here: /var/app/current/migrations/[database type]/0.0.0.sql. Run it from the database command prompt when logged in as a user with CREATE DATABASE permissions. By default, it names the Yarkon schema aphek, but you can change that if you want.
Yarkon does not require its own database, it can share with any other application.
Application Setup
Lastly, you need to tell the Yarkon servers how to access the database. Assuming you are using the standard Yarkon AMI, you need to update the configuration file /var/app/current/yarkon-server.pm2.json like so:
{
    "apps": [{
        "name": "aphek",
        "script": "./aphek",
        "watch": false,
        "env": {
            "PORT": 80,
            "DATABASE_DIALECT": "mysql",
            "DATABASE_HOST": "url.to.database",
            "DATABASE_PORT": 3306,
            "DATABASE_DATABASE": "aphek",
            "DATABASE_USER": "aphek-user",
            "DATABASE_PASSWORD": "password"
        }
    }]
}
If you run your Yarkon servers using your own scripts, make sure to set up the ENV variables in the same way.
Of course, update the placeholders to match your environment, and make sure the database user specified has WRITE permissions.
When done, restart the Yarkon service - when using the standard Yarkon AMI, you can do it from the command line using:
$ pm2 restart all
Network layout
The Yarkon service must be set up within a VPC, to guarantee it is secure.
To ensure the service can handle local network issues, set up your instances in different availability zones. It is recommended to have the Yarkon servers in your internal network - preferably with no public IP but at the very least firewall-ed from the internet - for security.
Use a standard AWS load balancer for internet access. Either ELB (classic) or ALB would work. Per AWS best practice, this is a great opportunity to set up SSL termination (HTTPS) on the load balancer, allowing you to route HTTP traffic between the load balancer and your instances over your internal network. When setting up the security groups, have the Yarkon servers accessible from the load balancer only.
